¶ Docker Networking
¶ Docker Network Overview
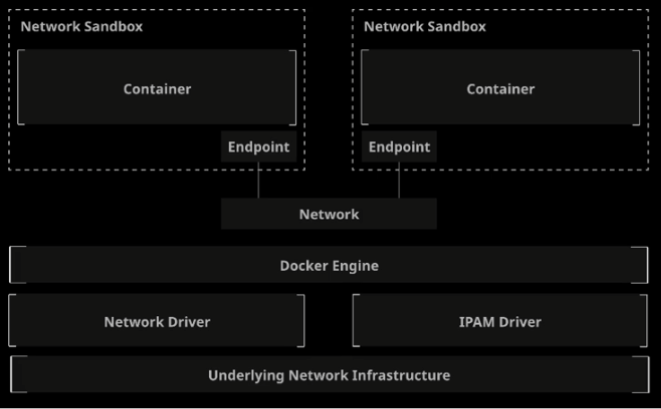
Docker has a network architecture called "Container Networking Model" (CNM). This model uses the libnetwork library which implements the CNM model.
CNM uses the following concepts:
-
Sandbox: An isolated unit containing all network components associated with a single container. Usually a Linux namespace (interfaces, ports, routes, DNS). One sandbox per container.
-
Endpoint: Connects a sandbox to a network. Each sandbox/container can have any number of endpoints, but has exactly one endpoint for each network it is connected to.
-
Network: A collection of endpoints connected to each other.
-
Network driver: Manages the actual implementation of CNM concepts.
-
IPAM Driver: IPAM stands for IP Address Management. It automatically assigns subnets and IP addresses for networks and endpoints.
By default, there are different network drivers:
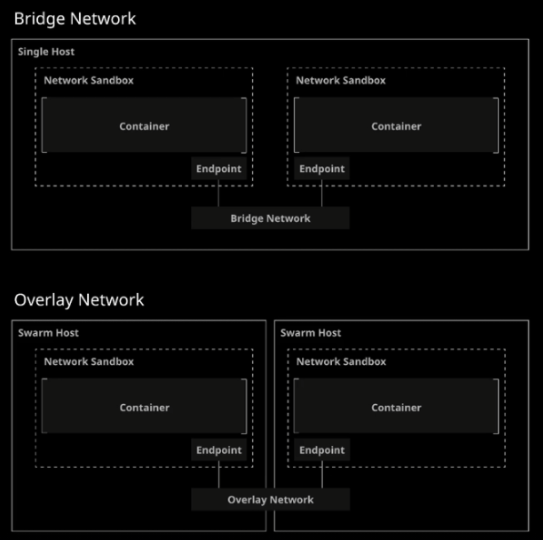
- bridge: Docker's default network, allows interconnection of containers connected to the same bridge. Bridge provides isolation between the host and containers.
- host: provides access to the host network without any isolation.
- overlay (EE, swarm): default network for docker swarm. Allows container interconnection between multiple docker nodes.
- macvlan: allows the association of a MAC address and VLANs to a container.
- none: as its name suggests, no network attached to the container.
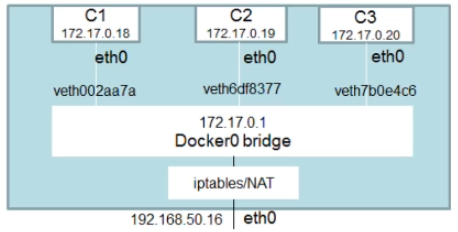
Looking at how CNM works in practice:
Docker ensures that the network can communicate with other containers as well as with the docker host.
You can see the list of networks by doing:
$ docker network ls
NETWORK ID     NAME                 DRIVER    SCOPE
23f4f9629e77   bridge               bridge    local
f80ad5726667   host                 host      local
18730864b45c   none                 null      local
You can force the use of a network when launching a container:
docker container run -d --name myhost --network host ubuntu:latest
¶ Bridge Network Overview
The bridge network will allow containers connected to the same bridge to communicate with each other while isolating them from containers not connected to the same network.
To identify which network a container is using, you can do:
docker inspect 8e55e763925a -f "{{json .NetworkSettings}}" | jq
Containers on the same network will logically be able to communicate with each other.
When no network is specified, the network will be the default bridge!
You can also create a User-Defined Bridge Network which is superior to the default bridge. (see next point)
¶ User-Defined Bridge Network
User-Defined Bridge = Bridge created by the user and not the default bridge!
You can list all containers present on a network via the command:
docker network inspect bridge
There are several differences between the bridge and the User-Defined Bridge:
- User-Define Bridges (UDB) provides better isolation and interoperability with other containers
- UDB provides automatic DNS resolution between containers
- Containers can be attached/detached from a UDB on the fly
- Each UDB creates a configurable bridge
- Containers linked on the default bridge share environment variables
In practice:
# Creating a UDB
$ docker network create --driver bridge mybridge
# If --driver is not specified, bridge will be chosen by default (UDB)

# Each created network adds a virtual card in "ifconfig"

$ docker container run -d --name mybridge01 --network mybridge ubuntu:latest sleep 3600
$ docker container run -d --name mybridge02 --network mybridge ubuntu:latest sleep 3600
$ docker network inspect mybridge
# More precise using --format
$ docker network inspect mybridge --format "{{json .Containers }}" | jq
{
  "60d7d9148053594eb27da9cb1cdeca44e5bd79dd7013f4831d1f237d67c9577d": {
    "Name": "mybridge01",
    "EndpointID": "f06e914ae2983192b86b970caaa226ba81e6768f838a7c37e2540127867c9c70",
    "MacAddress": "02:42:ac:16:00:02",
    "IPv4Address": "172.22.0.2/16",
    "IPv6Address": ""
  },
  "a16e7d000c4f2c7c9b543d48713ca3687895e78270be6b061925bce692e51807": {
    "Name": "mybridge02",
    "EndpointID": "86a0c8f5a19bbcd565c83f0b8784593e67704c9348c1936f0e5c45e859b6e641",
    "MacAddress": "02:42:ac:16:00:03",
    "IPv4Address": "172.22.0.3/16",
    "IPv6Address": ""
  }
}

$ docker container exec -it mybridge01 bash

$ apt update && apt install -y net-tools iputils-ping
root@60d7d9148053:/> ping mybridge02
PING mybridge02 (172.22.0.3) 56(84) bytes of data.
64 bytes from mybridge02.mybridge (172.22.0.3): icmp_seq=1 ttl=64 time=1.19 ms
64 bytes from mybridge02.mybridge (172.22.0.3): icmp_seq=2 ttl=64 time=0.288 ms
If the DNS name is not suitable, you can change a container's network alias:
docker run -d --name my-net-nginx --network-alias my-nginx-alias --network my-net nginx
You can curl both my-net-nginx AND my-nginx-alias
If the container is already running, you can attach an alias:
docker network connect --alias ALIAS NETWORK CONTAINER
# Example
docker network connect --alias another-alias my-net my-nginx
You can obviously disconnect a network from a container:
docker network disconnect NETWORK CONTAINER
docker network disconnect my-net my-nginx
And delete a network:
docker network rm NETWORK
You can remove all unused networks:
docker network prune
When creating a bridge, you can set options: docker network create | Docker Documentation
You can also connect/add a network to an active container:
docker network connect NETWORK CONTAINER
docker network connect mybridge mybridge01
¶ Host Network
This driver removes network isolation between the docker host and the container to use the host's network directly.
So if you launch an application with port 80 open, it will be accessible on the docker host's IP directly!
In practice:
# Creating a container
$ docker container run -d --name myhost --network host ubuntu

$ docker container exec -it myhost /bin/bash
apt update && apt install net-tools
netstat -ntlp # same ports as the host machine are open
ifconfig # Host interfaces are displayed

apt install nginx -y
/etc/init.d/nginx start
netstat -ntlp # port 80 will be open in addition to others
# We can reach nginx from the host machine's IP
¶ None Network
If you don't want to configure a network on a container, you can use "none" network.
This driver therefore does not configure an IP for the container and thus has no access to the outside of the container or even to other containers.
- can be used during testing for example
In practice:
$ docker container run -d --name my-none --network none alpine:latest
$ docker container exect -it mynone ash
ifconfig # Only loopback will be displayed
ping google.com # Bad request
¶ Publishing Container Exposed Ports
To publish port 80 on host port 8080:
docker container run -d --name webserver -p 8080:80 nginx
Nginx will be accessible from port 8080 on all interfaces of our host.
However, there is a second way to expose a port. Here we will expose ALL container ports:
docker container run -d -P --name webserver nginx
In this case, all ports will be published on a random host port.
¶ Linking Containers
# Creating a container
$ docker container run -d --name container01 busybos sh
# Linking container02 to container01
$ docker container run -d --link container01:container --name container02 busybox sh
# Running shell
$ docker container exec -it container02 sh
ping container # Success, pings container01's alias
However, this command may disappear at any time (see docker docs). It is therefore preferable to use a User-Defined Bridge to have dynamic DNS directly. However, it remains useful for DCA.
¶ External DNS:
You can change the default DNS. Either through the /etc/docker/daemon.json file (Docker Engine configuration file):
{
  "dns": ["8.8.8.8"]
}
Or via docker run:
docker run -d --dns 8.8.8.8 --name my-dns nginx
¶ Customizing Your Network
By default, a network will create an IP address range. You can force a subnet via the following commands:
$ docker network create --subnet <SUBNET> --gateway <GATEWAY> <NAME>
# Or:
$ docker network create --subnet 10.1.0.0/24 --gateway 10.1.0.1 my-network
You can also specify an IP range:
$ docker network create --subnet <SUBNET> --gateway <GATEWAY> --ip-range <IP-RANGE> <NAME>
You can assign an IP to a container via the following command:
$ docker container run -d --name network-test02 --ip 10.1.0.100 --network my-network nginx
You can create an internal network so that nothing is exposed to the outside:
$ docker network create -d bridge --internal localhost

# Let's test the connection
$ docker container run -d --name private-nginx -p 8081:80 --network localhost nginx

$ curl localhost:8081
curl: (7) Failed connect to localhost:8081; Connection refused
You will only be able to access nginx via the container's IP (or via a container on the same network). To do this, use docker container inspect.